Wednesday, December 11, 2013

Our First Christmas: Our Trees

Husband and I have been married for exactly 11 months today. Even though 11 months is quite a ways away from our wedding and we were almost married by this time last year, this is our first married Christmas whether it feels like it or not!

I'm hoping to get a few posts up about all of our decorations, and maybe even a few of our new traditions. Today, I'm showing off our trees, our fake Christmas trees. I know a lot of you put up real ones, but fake just last so much longer, and mine are so pretty this year that I pretty much never want to take them down.


It's not short, I was reaching over the dining table :)
 Our main tree used to live under the archway between our living room and dining room. It also used to be covered in red, white, black, and silver ornaments. Since we've been married we've bought a new couch that has a chaise sitting right where the tree would normally go and we've changed our room's colors from all neutral grays, white and black that I would add pops of red to for Christmas, to teal, green, and gold.

Here's a (grainy) shot of the old set up. I think this was my first year living in this house!


Since the chaise now sits under that window now and the red and silver wouldn't work, we ended up putting the main tree in the dining room and getting all new ornaments. Husband cared less about the ornaments, but I had a good time with him picking them out together.

Some close ups of my favorites...
Sparkly deep teal flowers

Bright green glass balls with drips that remind me of our drip art in the living room.

Silver with a band of gold and silver sparkles that tie in the silver we still have all over the house.

These little red guys came in a package with some teal, green, and gold ornaments and they charmed us enough to convince us to add a few pops of read all over our main living area.

I already had these black and white ornaments - they're probably 6 years old! I love how they tie into our new black and white rug. By the way, we got a new dining room rug.

On top of the black and white ornaments I had to add a few other past favorites. I dug through this bin of red and silver stuff...


 ...and pulled out these favorites:


Angel wings that my mom gave me a couple years ago, and a few other fuzzy ornaments that I think look a little like snow of the branches, and three silver stars that say faith, hope, and love. Whichever I feel represents where I'm at spiritually each year gets put in the front where I'll see it most. Last year it was love since I was about to get married, this year it's faith. Because I just need a little more of it. It's a great reminder of where our focus should be this holiday season!

My story doesn't end there, if you noticed, my title said trees. Since the main tree had to be moved to a place where there was space for it, the area where it used to be was looking a little dark. So we put up a second tree on the end table next to the chaise!


This little guy was about $12 from Old Time Pottery. We found some little sparkly ornaments in teal, green, gold, and red in the dollar bins at Target, and I added some of the gold snowflake ornaments we had leftover from the big tree. $3 in wired ribbon to tie in with the main tree and we had a little sparkle next to the chaise!

Since putting up the trees, my new couch spot is the chaise - check out this view and you'll see why:


And at night...


Not that I didn't love my red and silver decorations from way back when, but I looove these! It probably has something to do with the fact that we added 200 lights because half of the pre-lit tree was dead this year. It shimmers now!

That tree skirt, by the way, I made it myself. I probably should have done a tutorial on it. I had no idea it'd turn out at all so nice so I didn't take pictures as I went. But basically I folded 1 yard of teal fabric like this. Then I cut strips of green fabric and sewed them together to make one long strip of fabric. It's about 5-6 inches wide and 12-15 feet long (depends on how ruffle-y you want it). I hot glued it to the teal fabric pinching it into ruffles as I went, and then hot glued fancy gold ribbon on top of that to hide all the rough edges. I was simple, and I'd be happy to answer any questions if you want to make your own.

As great as the trees look, I still have a few crafts to tackle before I call it quits with the Christmas decorating. Tonight I'm making a cone tree forest - wish me luck! If all goes well, I'll try to get a tutorial on that up soon. 

How is your tree looking this year? Anyone else going a little crazy with multiple trees?

Wednesday, November 20, 2013

Fall Recap

It has been and extremely busy fall season. And that may even be an understatement. Most of October was spent with friends and family doing all things "October".

The first Sunday of October each year, my family heads to Southwestern Michigan to hit a few great pumpkin patches.


It's really fun not that my niece is old enough to enjoy these thing now!

The next weekend I headed down to Springfield, IL to go wedding dress shopping with my friend Nikki who's getting married next September. I wouldn't dare post any photos, and she hasn't decided on anything, but everything looked good on her! 

The next day, I hit up the Chicago Marathon to cheer on some friends who were running. I'm running it next year. Final answer. 

Not even close to a true depiction of how stunning this path really is...

The following weekend, we went up to Saugatuck, MI with my family. My parents decided to rent a 3 bedroom cabin so we could all go. We hung out and chatted Friday night, Saturday morning Husband and I went for a long run on the Kal-Haven Trail (a gorgeous, perfect run!), got breakfast with the whole fam, shopped downtown Holland, and cuddled with the niece and watched Nightmare Before Christmas.


Someday, I'm stealing this kid!

We were actually watching her because her parents (my sister and her boyfriend/niece's dad) were off at the lighthouse in South Haven getting engaged! They'll be getting married next October. I've never stood up in a wedding and next year I'll have two within 30 days! I'm excited! (Because I haven't had to spend any money yet... ha!)

Soon after came Halloween. My mom, sister and niece came over for Trick or Treating and brought some Panera soup with. Yum! My sister (and niece of course) live in an apartment building and my mom lives on a random street that's not really in a neighborhood so they get no trick or treaters. Last year she had two. And one of those she chased down and forced to take the candy. We had around 285 kids and ran out of candy by the end of the night! Sometimes I really love my neighborhood.

Early November was nearly as exciting as October due to an event I helped out with at our church. I was going to include a tidbit about Intersections in this post, but when I looked back at all the pictures, I decided it needed it's own post. That will be soon to come, but in case you can't hardly wait, here's a sneak peak:


How was your fall season? Anyone else feel like fall gets busier every year?

Wednesday, September 25, 2013

The Newest Normal

When I was in high school. I was in marching band. I was actually in colorguard. And I was actually the captain. Incidentally, I was a huge geek. I would live for Saturdays which we spent driving for hours on a school bus to the middle-of-nowhere Illinois to perform a 10-12 minute "show" on a "football" field and then wait all day watching other bands and waiting for the awards ceremony - in which we'd win most everything but "Best Colorguard". No joke, and it was still the highlight of my existence.

One of my fondest memories was realizing there was a town in middle-of-nowhere Illinois called "Normal". We had plenty of jokes about how boring it'd be to live in Normal. Go to Normal high school and work at the Normal grocery store. Order pizza from the Normal pizza place and go bowling at the Normal lanes. Who would have thought that 11 years later I'd love "normal" so much. Not the city, my life. 

I've been through plenty of changes and I always look forward to settling in a little bit. I love predictability and routine. I am so type A it's ridiculous. In the past 12 months I've gotten engaged and married, begun to share my our home with Husband, changed up half the decor in the house, and gotten a new job. I think I've met my quota of new for the year! 

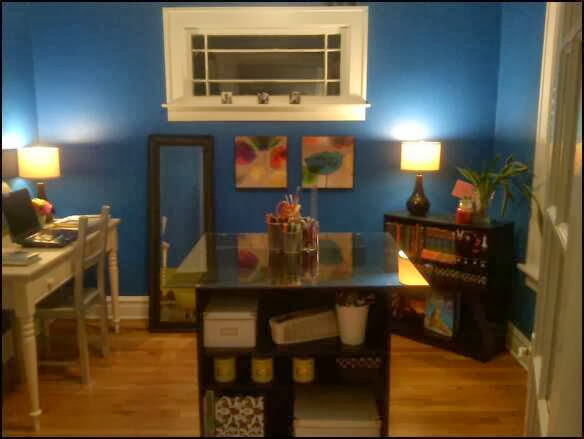
One of the best things I've done to ease the transitions was to carve out a space for myself in our home. Meet my office!


It's come a long way since it's humble beginnings. First it was a library. (Because I was a teacher with summers off and time to read books!)


Then it was an art studio. (Because I was under-employed and had free time and thought I'd be a crafter and sell things on etsy.) 


I should mention that my art studio was inspired by my mom's cousin's art studio in her former home in Michigan. How gorgeous is this place!?


After it was an art studio, it was a mess. (Because I had started working full time and didn't have to read, craft, or clean apparently.)


Then it became an under used office. I was living in a 3 bedroom home by myself and just needed to clean it up, but to be honest, I spent zero time in here.

Now that I'm married, my office has become my getaway. Husband is watching (another) movie I don't care to watch? I hang out in my office and watch Eat Pray Love. Time to reconcile our finances? I've got a nice clear desk to sit at in a quiet room. Wrapping a gift for someone? There are a few boxes of gift bags and cards on shelves nearby. It is was perfect. 

At my previous job, with my one hour lunches, I got a lot of those things done at work. The finances, the meal planning, mailing things out, and even sometimes blogging. My new job doesn't afford me those luxuries. (And I'm not complaining!) I have a more condensed work day, and less access to my personal responsibilities. 

So my office once again is in need of a facelift. I'm going to try to commit to something here, and I need you all to hold me accountable. I need to make this space fit my new needs and wants and I want this baby wrapped up before the holidays. (Because by then I'd much rather be posting about Thanksgiving dinner and Christmas decorations!) I'd love to hear any suggestions or advice you have!

Before:


After:

TBD!

Monday, September 16, 2013

Random Collection of Thoughts

I've been absent from this page again. Oops! Consistency is obviously not a strength of mine. I have a bunch of old posts I want to share, but it seems strange to jump back in with a post about our vacation to Traverse City, Michigan, or on how we finally hung curtains, the little tweaks I've done to my office, enjoying married life as an introvert, or my recent half marathon. Hopefully those stories will all their their way here in due time.

Before I get to normal life things (normal for me I guess), I wanted to share a few things that I'm really flipping excited about.

1. My New Job! 
    I've been working as a sales rep for a remodeling company for about a year and a half, and before that I was a sales assistant for the company. I've spent two and a half years with the company and Husband can assure you, they've been rough. To make a long story short, it's the epitome of a toxic work environment.
    I'm hopeful that my new job in accounting for a large freight company will be quite different. I already know that my work day will be shorter, my pay will be a little more and more consistent since I'm not working for a bonus, my commute will cut in half from 25 minutes to 12, and I'll have benefits like PTO, vacation time, and a retirement plan. The office environment is still casual, and I'll be able to leave my work at work.

2. A New Normal
    I've been married for 9 months now, and I feel like we've settled into more of a routine lately. I love routines. Both my mom and Husband could care less about routines; I just love being in a rhythm. We're better about communicating our schedules, we're cooking certain nights, the house is staying cleaner, we're learning each other's quirks. It's nice!
  Once I start my new job, there'll be another new normal. My hours aren't changing much, but I do get a half hour paid lunch instead of an hour unpaid lunch. And I get all evenings and weekends off. I did a little bit of math and figured I'll get about 7 hours of my life outside of work back each week! I'm hoping to devote some of that time to blogging.

3. Elton John
    I lurve him. Maybe not that much. But I love his music. I can only think of one song of his that I don't like. It's weird, I know, sue me.
    Anyway, he's coming to Chicago! A few months ago, Husband said if he ever played here, we could go. I bet he thought I'd forget he said before it actually mattered. Ha! Hopefully it won't be a problem getting tickets.

And just because it feels sinful to post without including a picture... Here's my cat snuggling with me after the half marathon. She makes me happy.


What are you excited about lately?

Thursday, August 8, 2013

Gettin' Drippy

Before I moved into this house, I lived at my parents where I had the basement as a living room/dining room/office for 22 year old self. I had collected furniture and artwork and set up my living space so that not only would I have a place to hang out away from my parents, and that I would take with me when I bought my first place. Well, when I did buy my new place, the wall space wasn't the same and I ended up with artwork above the couch that was always too small. Beside the fact that it was too small for the space, I'd been looking at it for 7 years, and it wasn't my style any more.


When Husband and I got married, we got a larger couch and painted the walls a lighter color which only made the problem worse. Along came one of my favorite food and healthy living bloggers to save the day. The talented Taralynn behind Undressed Skeleton is not only an inventive chef, but artistic and creative. When she posted on her bedroom, and I saw her DIY art, I knew it'd be perfect above our couch.  She hadn't posted a tutorial so it was up to me to figure it out.

This first thing I did was buy materials and make sure they'd fit in the space the way I intended them to. No need to waste time and money on something that wouldn't work!

That'll do Donkey, that'll do.
Net step was to get them outside - on a tarp this time! (Although colored grass is pretty darn exciting too.) I knew I wanted the edges gold. I had seen it on a $200 painting at Home Goods and thought it was a neat unexpected touch. I didn't bother masking off the top of the canvas since I figured it was going to be covering it in paint drips anyway. A little bit of the gold got onto the top edge of the canvas and I decided that I liked it so much, I added more to one of the short ends. And I liked that so much I decided to add black to the other short end for contrast. The gold end stopped a little too suddenly and I was out of gold paint so I added a little silver spray paint to blend it in with the white canvas. I stopped there deciding that my background was just enough.


And then it rained all over my beautifully prepped paintings. Whomp. Whomp. Husband helped me as I rushed to get plastic over my babies pieces of artwork. Which obviously got stuck to the paint so there were some touch ups and imperfections. One of the best parts of this project though, is that it looks better with a few imperfections.

Green tarp is courtesy post-camping clean up, and don't even get me started on the neighbor's yard. Privacy fence is desperately needed!
So once the spray paint layer was dry, I brought one of the paintings inside to decide which direction I wanted them to go.

Black on bottom to ground it?
Or black on top to bring your eye up?
Let me interject a quick tip here:

Take pictures of your artwork in progress where it will go when finished. 

Text them to your design-savvy friends, get second opinions. Look at them for a while. I was initially thinking black on bottom, but once I showed Husband the pictures, and he said black on top, I rethought my decision and went with black on top. He was totally right! The couch was already so dark and I needed to bring some of that darker color up toward the ceiling.

With that decided, I started slinging paint. I propped the paintings up against our glass patio table (washable, unlike wood) I grabbed all of the craft paint we picked out, my jar of little art paint brushes in varying sizes. I filled the jar with rinsing water and got some paper towel to dry the brushes of excess water.

Husband and I went to the craft store together and decided on a collection of colors we loved and wanted to incorporate into the room.
I used a few different methods to "drip" my paint onto the canvases. I'll call them Drip, Squeeze, and Splash for reference:

Drip: I took the main colors we wanted to see the most of (teals and greens) and squeezed varying sized globs of paint right at the top of the canvas. I then took a paint brush (different every time so nothing looked too matchy) and gently pushed the paint down the canvas. I didn't try to make these the same length at all. Sometime I would let the paint finish dripping on it's own, sometimes I would paint it out thin on the canvas. It looked awful after this step. Yours will too. It's okay. continue onto the next step.

Squeeze: The darker and more neutral of the secondary colors we liked (oranges, reds, whites, black) I squeezed onto the painting by actually squeezing the bottle pretty hard. it hit the entire canvas this way and I hardly had to guide the paint down with a brush. This created skinnier lines that spanned the whole length of the canvas.

Splash: I reserved the brightest of our accent colors (yellow, pink, light teal) for this step. These were the colors I want to see very little of, but we needed to tie in because they're in the dinning room and office that are open to the living room. I did a maybe 2 drips from the top of the canvas and then I would splash the canvas from the bottom up with the paint. To do this, you just need to squeeze the paint as you move your arm up the length of the canvas then release the squeeze as your hand moves down.

You can see the blues and greens in the background are wider and more solid. The reds, oranges, whites, and blacks have may smaller drips from the top. The pinks and yellows are splashed in skinny stripes from the bottom up.
After I finished all three steps, I took a water spray bottle on stream and lightly sprayed my painting from the top pointing down. This helped along any drops that were still working their way down and added a few cool water color-looking streaks. This step is totally optional.

Sunbathing - waiting is the hardest part!
I let them dry in the sun for a few hours and then added a layer of UV Resistant matte coating for protection.


I was impatient to see them hung, so we risked damage to the paintings, our furniture, our floors, etc. and brought them inside to hang. We used some painter's tape and a level to place our nails then carefully hung the still tacky paintings above the couch. I hung them about 8 inches above the couch, about 10 inches from the ceiling, and about  2 inches above the windows. I think art looks funny when it's lined up with the tops of the windows or curtains. It's always safer to have art too close the the furniture than too close to the ceiling. We still have curtains to hang so these paintings will end up just between the curtains and the tops of the windows.

Before we take a look at the 'after', let's take one more peek of the 'before' shall we?

Before:

After:


We are in love with the art gallery feel in here now. The height of the ceiling is really highlighted and the scale and style of the art work is appropriate for the space.

I happily discovered that the materials I would need were very inexpensive. I spent about $55 total. Here's the breakdown:

24 x 48 canvases = $11 each X 3 = $33
Gold, silver, black spray paint = $0
Small acrylic craft paints = $1.25 each X 14= $17.50
UV Resistant Coating = $4.50

The canvases I found on sale at Michael's, 3 for the price of 1. One was normally $30, so I got all three for about $33 including tax. I already had the spray paint I needed, but if you needed to buy it each can would be about $4 a piece for a total of $12 for spray paint. The UV resistant coating was something I stumbled upon at Jo-Ann Fabrics. I wanted some kind of clear coat to keep the vibrant colors fresh year after year. This Was about $4.50 after a 40% off coupon. I had looked at 4' x 6' pieces of art online and in stores, and they were hundreds of dollars. I have to say that I'm proud and excited about my $55 DIY art. 


I'd love to hear any suggestions or tips anyone has for art like this. We still have a ton of walls that need filling - any other genius DIY art ideas out there??

Monday, July 29, 2013

Seasonal Me and A Simple Sweet Jewelry Organizer

I'm going to start off by ruining the surprise:


I started a project AND finished it!

But before I give you the tutorial, I wanted to explain why I've been MIA for these last several weeks (months maybe?)

I've talked a few times on here about how I'm a runner. In fact, my post about why I run is one of the most visited pages on this blog. The thing is, I work full time, and outside of work I can usually manage 2 bigger commitments and/or a hand full of smaller , short term ones. Right now, I'm training for my second half marathon. So that's slot #1 of "bigger commitments". My other smaller commitments are really just spending more time with family and friends, and working through the kinks in my newly-wedded life. As I started to think about it more, I realized that my hobbies are fairly seasonal.

In the winter, I'm a total nester. I want the house clean, decorated, cozy, and since I'm in it more, I have more time to tweak it. And there's more time for projects around the house (at least inside) because I'm not running as much.

Summer, at least the past two, I've been training for races. Running several miles a day, and eating right to go along with it takes time. Not to mention the Saturday afternoon recovery naps.


Spring and fall are kind of a combination of the two versions of me, a little home decorator, a little stubborn athlete.

I guess what I'd like to know from anyone reading this, whether it's your first time hear or if you're a regular reader, would you like to see this blog reflect my seasons too? Would anyone wanted to hear about my adventures in running? Or is that boring and you'd like to see home decorating things only? Feel free to respond in the comments please.

Back to my original purpose for writing today - simple jewelry organizer.

I'm almost ashamed to even post this, but here's what my jewelry collection used to look like.


I promise you, the reason I was getting to work late was because most of my jewelry was tangled around a plastic Bachelorette necklace. Husband never mentioned that he was sick of looking at it, but I knew having it cleaned up would go a long way in making what used to be my bedroom ours.

I started my project like anyone would, researching some ideas on Pinterest. There are some seriously cool ideas out there! In the end though, most of them were too complicated or too costly for me to handle. So I took a good few months to think it over and finally figured out something that would work.

I had a couple of 11 x 14" picture frames I had bought for a friend's project that I never got too. I sprayed those in my favorite teal blue color. In the front yard. Without a drop cloth. (Praying for rain so grass will grow and blue can get cut off!)


I have a lot of necklaces and I decided to make one frame for those and the other for bracelets and earrings. On the necklace display, I screwed in several s hooks that I picked up from Menards for about 10 cents a piece. I just turned them with my hands into the inside of the top of the frame. I used pliers for the last couple of turns to make sure the hooks were in all the way, and I probably should have worn gloves. My finger tips are a little tender today.


On the earring and bracelet display, I screwed in more s hooks to the insides of the sides of the frame. I marked these out about 2 1/2 inches apart with the first set of hooks an inch from the top. I then used jewelry chain with larger links to run from one side of the frame to the other. The chain was pretty thin so I used another s hook, a figure "8" shaped one, on the end of each length of jewelry chain so I could hook and unhook the chain more easily to get bracelets off and on the chain. I just used my pliers again to open and close these figure "8" s hooks to connect them to the chain.


I had originally planned on leaving the backs of my frames open, but them thought my jewelry would look much better if it was backed by some kind of fabric. My next thought was some kind of fun print. Then I realized, black velvet. Jewelry always looks great against black velvet.


This is where things got really lazy. Well not quite yet. First I went to Jo-Ann and found a $5 remnant of black velvet. Then things got lazy. I took the cardboard that was in the back of the picture frame, cut the fabric about and inch or two larger than the cardboard, and taped it to the cardboard with packing tape. Told you- lazy. You could probably get some plywood cut to the size of your frame opening and put down a layer of batting and then your fabric, but I was on a role and would rather tape and fix later, just to have something finished now.


I used the glass clips to clip the fabric covered cardboard into place then hung them in my pseudo walk in closet with a few 3M velcro strips.

I'm happy, Husband is happy, and my boss is happy. (Seriously, I was on time for work today!)


I still need to come up with a solution for my larger bracelets, anyone have any suggestions? How are you organizing your jewelry?

Monday, June 10, 2013

Front Yard Phase One Complete! Kinda.

A few years ago there were some ugly, overgrown, starting-to-die bushes in the front of my home. This was before I was married, or even engaged. Being the smart single gal I was (Not that I'm not still smart, just no longer single.), I had my dad pull them out.

To make a long story short, he cut them down, but left me to dig them up. Yeah, right. Like that was going to happen. Fast forward a few years, and I'm itching to remove the stumps. I'm embarrassed to come home from my morning run to this:


A few weekends ago, Husband and I (but a little more Husband than me) pulled out this stumps! You can read all about it here - complete with directions and advice if you're ready to rip yours out too. It looked waaaaay better, but still very incomplete.


This weekend, we can finally call phase one of this project complete! It only took 2 trips to Menards, 1 trip to Home Depot, 10 bags of top soil, 10 bags of mulch, a few hours, and a little bit of muscle. Okay, maybe a little too much muscle was involved. Husband did manage to break the metal rake in half. But we now get to come home to this:


Lovely! Lets take a closer look at those garden beds shall we?


My what large/long hips you have!

I picked out Plantain Lily Hostas and Petunias. I kill basically everything I plant so I went with hardy plants that didn't need a ton of maintenance. 

The hostas are best suited for partial sun, so we'll see how those do in our yard that gets a lot of intense afternoon sun. I hear that the worst that would happen is the leave will turn brown, and if that's the case, I'll just replant them in the backyard later. My neighbors all have hostas that look great, so I'm crossing my fingers for these guys. 

Petunias are just really hard to kill. I've had them growing in my backyard (we live near Chicago) in December in previous years. I made sure to get them in a fun bright color.

We also decided to go with black mulch. I love how the plants pop against the dark mulch. From a distance it almost looks like we have perpetually perfect soil. 

How about a before and after? (Sorry these aren't fancier, getting used to a new computer...)

Before:


After:


We still have a ways to go in the front yard. We're hoping to:

  • Kill the ants in the yard
  • Kill the weeds in the lawn
  • Dig up three more bushes in the far front corner of the yard (Phase 2)
  • Reseed the lawn (In the fall)
  • Build up the garden beds with paver stones (Phase 2)
  • Plant a tree (This year, if I can convince Husband)
  • Add additional garden beds around the tree, outlined in pavers (Phase 2)
  • Paint the house! (Phase 2, or maybe 3?)
And as you can see, we still need to carry this front yard makeover to the side gardens, and eventually to the backyard. Our goal is to have the entire yard tie together as simply and low maintenance as possible. As we have the funds and free time to clean up more of the yard, I'll be back with more updates. 


Do you have any outside projects going on?